
Contact our support team directly at: support@bivatec.com
This app has been designed to help crop farmers manage their activities with ease. It's a crop farm record-keeping app that enables farmers to manage crops and fields, register fields and cultivations, track field/cultivation treatments, record crop harvests, track revenue and expenses, etc.
From the Home Screen, follow these steps:
- Select the Crops & Fields menu.
- Tap on Crop List.
- Tap on the button in the bottom right-hand corner of your screen.
- Enter all the necessary details about the Crop.
- Tap on the Check/Save icon () on the right-hand side of the screen to save the Crop into the app.
- The Crop will appear in the list of added crops.

From the Crop List details Screen, follow these steps:
- Select the crop to view its details.
- Tap on the three dots () on the right-hand side of your crop's name.
- Tap on Edit Record.
- Edit all the necessary details about the crop.
- Tap on the Check/Save icon () on the right-hand side of the screen to save the changes to the crop in the app.

From the Crop List screen, follow these steps:
- Select the crop to view its details.
- Tap on the three dots () on the right-hand side of your crop's name.
- Tap on Delete Crop.
- A pop-up screen will appear.
- Tap on the button to delete the crop.
Note
Once you tap on the Delete button, all the information attached to that crop will be permanently removed, including variety.

From the Home Screen, follow these steps:
- Select the Crops & Fields menu.
- Tap on Field List.
- Tap on the button in the bottom right-hand corner of your screen.
- Enter all the necessary details about the Field.
- Tap on the Check/Save icon () on the right-hand side of the screen to save the Field into the app.
- The Field will now appear in the list of added Fields.

From the Crop List screen, follow these steps:
- Select the crop to go to the crop details screen.
- Tap on the three dots () on the right-hand side of your screen.
- Tap on Add Variety to go to the New Crop Variety screen.
- Enter all the necessary details about the crop.
- Tap on the Check/Save icon () on the right-hand side of the screen to save the crop into the app.

From the Field List screen, follow these steps:
- Select the Field to go to the Field details screen.
- Tap on the three dots () on the right-hand side of your field name.
- Tap on Edit Record.
- Edit all the necessary details about the Field.
- Tap on the Check/Save icon () on the right-hand side of the screen to save the changes of the Field into the app.

From the Field List screen, follow these steps:
- Select the Field to go to the Field details screen.
- Tap on the three dots () on the right-hand side of your field name.
- Tap on Delete.
- A pop-up screen will appear.
- Tap on the button to delete the Field.
Note
Once you tap on the Delete button, all the information attached to that field will be permanently deleted.

From the Home Screen, follow these steps:
- Select the Activities menu.
- Tap on Plantings.
- Tap on the button on the bottom right-hand side of your screen.
- Enter all the necessary details about the planting.
- Tap on the Check/Save icon () on the right-hand side of the screen to save the planting into the app.
- The planting will now appear on the list of added plantings.

From the plantings screen, follow these steps:
- Tap on the three dots () on the right-hand side of a planting card.
- Tap on Edit Record.
- Edit all the necessary details about the planting.
- Tap on the Check/Save icon () on the right-hand side of the screen to save the changes of the planting into the app.

From the Plantings details screen, follow these steps:
- Tap on the three dots () on the right-hand side of your planting.
- Tap on Delete.
- A pop-up screen will appear.
- Tap on the button to delete the planting.
Note
Once you tap on the Delete button, all the information attached to that planting will be removed permanently.

From the Home Screen, follow these steps:
- Select the Activities menu.
- Tap on Harvests.
- Tap on the button on the bottom right-hand side of your screen.
- Enter all the necessary details about the harvest.
- Tap on the Check/Save icon () on the right-hand side of the screen to save the harvest into the app.
- The harvest will now appear on the list of added Harvests.

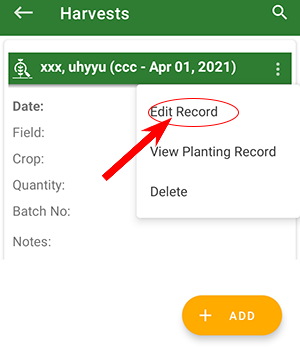
From the Harvests details screen, follow these steps:
- Tap on the three dots () on the right-hand side of a plant.
- Tap on Edit Record.
- Edit all the necessary details about the Harvest.
- Tap on the Check/Save icon () on the right-hand side of the screen to save the changes of a harvest into the app.
From the Harvests details Screen, follow these steps:
- Tap on the three dots () on the right-hand side of the Harvest card.
- Tap on Delete.
- A pop-up screen will appear.
- Tap on a button to delete the Harvest.
Note
Once you tap on the Delete button, all the information attached to that harvest will be removed permanently.

From the Home Screen, follow these steps:
- Select the Activities menu.
- Tap on Treatments.
- Tap on the button on the bottom right-hand side of your screen.
- Enter all the necessary details about the Treatment.
- Tap on the Check/Save icon () on the right-hand side of the screen to save the treatment into the app.
- The treatment will now appear on the list of added Treatments.

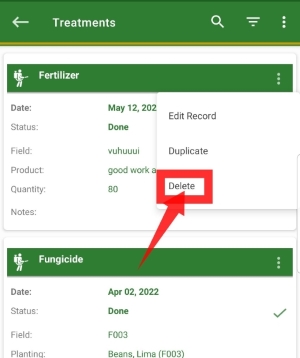
From the Treatments details screen, follow these steps:
- Tap on the three dots () on the right-hand side of the treatment.
- Tap on Edit Record.
- Edit all the necessary details about the Treatment.
- Tap on the Check/Save icon () on the right-hand side of the screen to save the changes of the treatment into the app.

From the Treatments screen, follow these steps:
- Tap on the three dots () on the right-hand side of your Treatment card.
- Tap on Delete.
- A pop-up screen will appear.
- Tap on a button to delete the Treatment.
Note
Once you tap on the Delete button, all the information attached to that treatment will be removed permanently.
From the Home Screen of My Crop Manager, follow these steps:
- Tap on Transactions and select the INCOME tab.
- Tap on the button on the bottom right-hand side of your screen.
- Enter all the necessary details about the income.
- Tap on the Check/Save icon () on the right-hand side of the screen to save the Crop into the app.
- The income will now appear on the list of added income.

From the Home Screen of My Crop Manager, follow these steps:
- Tap on Transactions and select the EXPENSE tab.
- Tap on the button on the bottom right-hand side of your screen.
- Enter all the necessary details about the Expense.
- Tap on the Check/Save icon () on the right-hand side of the screen to save the Crop into the app.
- The Expense will now appear on the list of added Expense.

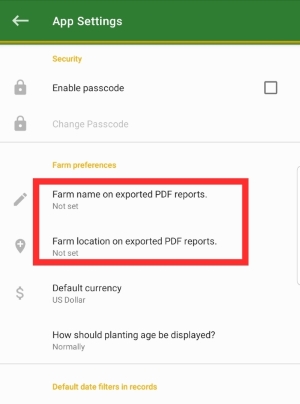
From the Home screen of My Crop Manager, follow these steps:
- Tap on the menu icon from the top left-hand side of the app to show the drawer menu.
- Tap on Settings under Preferences.
- Go to Farm preferences then tap on "Tap to set your farm's logo" under Farm logo to set it.
- Pick the logo of your choice and then the selected logo will show up on every exported PDF.
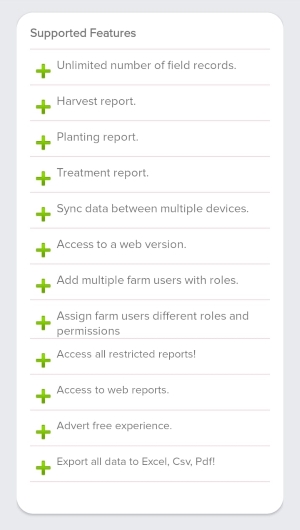
One should get this package when he or she wants to:
- Share data / information between different users on the farm account.
- Get access to a web version for central management.
- Add multiple farm user accounts for record keeping.
- To view restricted reports i.e field report, planting report, harvest report, treatment report, etc.
- Export data to excel, csv, pdf, etc.
- To add an unlimited number of field records.
- To sync data between multiple devices.
From the home screen of My Crop Manager, follow these steps:
- Tap on the menu Icon from the top left-hand side of the app.
- A drawer menu will pop up from the left side of the app.
- Tap on Settings under Preferences.
- Tap on Default Currency to change the currency.

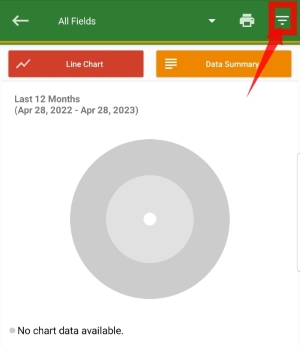
From the home screen of My Crop Manager, follow these steps:
- Tap on the Reports icon.
- On the reports details screen, choose the type of report you want, for example field Status report, harvests, etc.
- Tap on the filter () icon on the right-hand side of your screen to filter by either month or custom range.
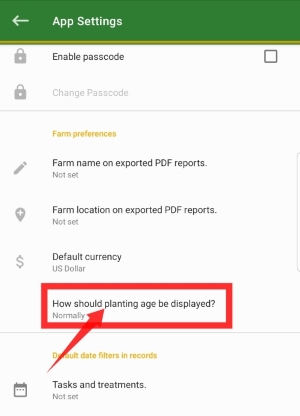
From the Home screen of My Crop Manager, follow these steps:
- Tap on the menu icon from the top left-hand side of the app to show the drawer menu.
- Tap on Settings to take you to the Preferences.
- Go to farm preferences and tap on "how should plant's age be displayed" to set the age, for example weeks, months, etc.
From the Home screen of My Crop Manager, follow these steps:
- Tap on the menu icon from the top left-hand side of the app to show the drawer menu.
- Tap on Settings to take you to the Preferences.
- Tap on Farm name and Farm location in order for you to set them.
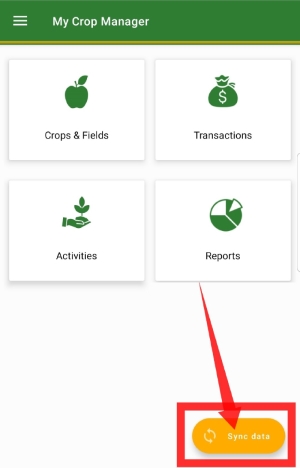
From the Home screen of My Crop Manager, take the following steps;
- Tap on the sync data button at the bottom of the home screen.
- Wait until the app brings a message "sync completed successfully".
From the Home screen of My Crop Manager, take the following steps;
- Tap on the menu icon from the top left-hand side of the app to show the drawer menu.
- Tap on Settings to take you to the Preferences.
- Go to default date filters to set the dates for events, etc.
