Contact our support team directly at: support@bivatec.com
This app is designed for goat farmers to manage their goat farming business/hobby. It tracks and records farm goat events, such as breeding, pregnancies, milk production, income, and expenses. Additionally, it generates both visual and PDF reports on the fly.
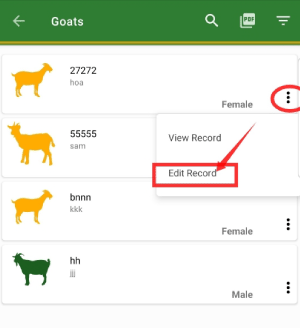
From the Home Screen of the app, follow these steps:
- Select the Goat menu.
- Search for the goat by name or tag number from the goats list.
- Tap on the three dots () on the right-hand side of the goat card.
- Choose Edit Record from the drop-down menu.
- Edit all necessary details about the goat.
- Tap on the Check/Save icon () to save the goat record.
From the Goat list screen, follow these steps:
- Tap on the search icon ().
- Search for a goat by using either tag number or name.

From the Goat List screen, follow these steps:
- Tap on the filter/funnel icon in the upper right-hand corner of the screen after the search icon.
- Filter goat records by using any desired filters.

- Bucks: These are sexually mature male goats used for breeding.
- Does: These are female goats that have reached breeding age.
- Doelings: These are immature female goats which are not yet sexually active.
- Bucklings: These are young male goats less than a year old.
- Lactating: These are does/goats that are currently producing milk.
- Non-Lactating: These are does/goats that are not currently producing milk.
- Wethers: These are male goats that have been castrated.
From the Goat List screen, follow these steps:
- Tap on the goat card to navigate to the details page.
- Tap the three dots () from the upper right-hand corner of the screen.
- Select Add Event.
- Enter the necessary event details and save the record.

From the Goat list screen, follow these steps:
- Tap on the goat card to navigate to the details page.
- Tap the three dots () from the upper right-hand corner of the screen.
- Select Change Stage.
- Select the desired goat's stage.
- Tap on the button to save the changes.

From the Goat details screen, follow these steps:
- Tap on the goat to view its details.
- Tap on the three dots () in the upper right-hand side of the screen.
- Select Change Status.
- Select the new goat's status (e.g., Pregnant, Lactating, Non-Lactating, etc.).
- Tap on the button to save the changes.

To add a picture to a goat, follow these steps:
- Go to the Goat list screen.
- Select the goat you want to upload the picture to.
- Tap on "Click to view/upload picture...".
- Then tap on "Click to upload a new picture ...".

From the Home screen of My Goat Manager, follow these steps:
- Tap on the menu icon from the top left-hand side of the app to show the drawer menu.
- Tap on Settings under Preferences.
- Go to Farm preferences then tap on "Tap to set your farm's logo" under Farm logo to set it.
- Pick the logo of your choice and then the selected logo will show up on every exported PDF.
From the Home screen of My Goat Manager, follow these steps:
- Tap on the menu icon from the top left-hand side of the app to show the drawer menu.
- Tap on Settings under Preferences.
- Go to Goat stage settings then tap on "When do you wean kids" to set it.

From the Home screen of My Goat Manager, follow these steps:
- Tap on the notification icon in the top right-hand corner.
- Here you will be able to see the upcoming goat deliveries in the next 30 days, upcoming kid weaning dates, upcoming heat return dates, and breeding insights.
NOTE:
Upcoming dates for farm insights are only available if goats have dates for breeding, weaning, and among others respectively.

From the Goat List screen, follow these steps:
- Tap on the goat card to navigate to the details page.
- Tap the three dots () from the upper right-hand corner of the screen.
- Select Print Pdf.

In order to use the breeding report, follow these steps:
- Always record a Breeding event whenever you breed any goat on the farm.
- The app will calculate the expected return to heat date.
- The app will then generate a report for both upcoming and past breeding.

In order to use the pregnancy report, follow these steps:
- Always record a Breeding event whenever you breed any goat on the farm.
- When you confirm pregnancy, record a successive Pregnant event on the goat.
- The app will then generate a report for goat pregnancies.

From the Goat list screen, follow these steps to archive a goat record:
- Tap on the goat card to navigate to the details page.
- Tap the three dots () from the upper right-hand corner of the screen.
- Select Archive Goat.
- Enter the necessary information.
- Tap on the button to save the changes.

In case you want to unarchive a goat record, you will have to take the following steps:
- Go to the Goat List screen.
- Search for the goat by name or tag number.
- Tap on the goat you want to unarchive to take you to the details screen.
- Tap on the three dots () from the upper right-hand corner of the screen.
- Select Unarchive goat.
- Tap to unarchive the record.

From the Goat list screen, follow these steps:
- Tap on the goat card to navigate to the details screen.
- Tap the three dots () from the upper right corner of the screen.
- Select Delete Goat.
- Tap on the button.
All records for that selected goat will be deleted permanently such as milk, events, expenses and the revenue attached to this goat.

From the home screen of My Goat Manager, follow these steps:
- Tap on the Milk Records menu.
- Tap on the button in the bottom right-hand corner of the app.
- Enter all the necessary milk information.
- Tap on the Check/Save icon () to save the milk record.

From the Milk Records screen of My Goat Manager, take the following steps;
- Tap on the three dots() on the milk record card.
- Select Edit Record.
- Enter the necessary information.
- Tap on the Check/Save icon( ) to Save the changes.

From the Milk Records screen of My Goat Manager, take the following steps;
- Tap on the three dots ( ) on the milk record card.
- Select the Delete option.
- Tap the button

From the Events screen of My Goat Manager , take the following steps;
- Tap on the three dots ( ) in the upper right hand corner of the app.
- Select New Mass Event.
- Enter all the required details.
- Tap on the Check/Save icon ( ) in the upper right hand corner of the app to save.
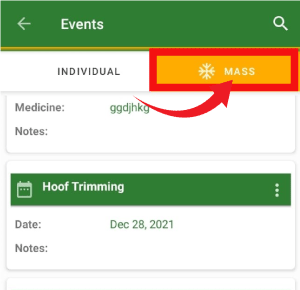
From the Events screen, take the following steps;
- Select the Mass Events tab.
- Search for mass event by name or type.
- Tap on the three dots ( ) on the right hand side of the mass event card.
- Tap Edit Event and it will take you to the Edit Mass Event screen.
- Enter all the required information.
- Tap on the Check/Save icon( ) in the upper right hand corner of the app to save the changes.

From the Events screen , take the following steps ;
- Select the Mass Events tab.
- Search for mass event by name or type.
- Tap on the three dots ( ) on the right hand side of the mass event card.
- Tap Delete.
- Tap on the button to delete the event.

From the home screen of My Goat Manager , take the following steps;
- Tap on the Transactions menu and select the INCOME tab.
- Tap on the button.
- Enter the necessary information.
- Tap on the Check/Save icon( ) in the upper right hand corner of the app to Save.

From the home screen of My Goat Manager , take the following steps;
- tap on Transactions menu and select the EXPENSES tab.
- Tap on the button.
- Enter the necessary information.
- Tap on the Check/Save icon( ) in the upper right hand corner of the app to Save.

From the home screen of My Goat Manager, take the following steps;
- Select the Reports menu .
- Choose the type of report you want to filter i.e Milk Report e.t.c.
- Tap on ( ) icon in the right hand corner of the screen.
- Select the desired period filter.

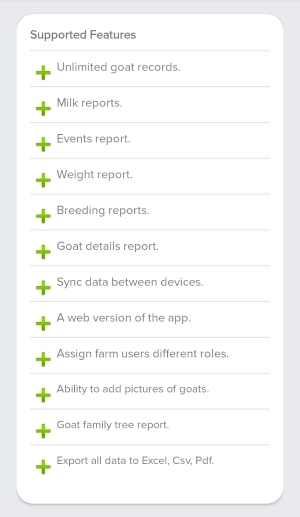
One should get this package when he or she wants;
- To share data / information between different users on the farm account.
- Get access to a web version for central management.
- Add multiple farm user accounts for record keeping.
- To view restricted reports i.e Milk Report, Weight reports, Events Report, Goat Details Report, Breeding reports etc
- Export data to excel, csv pdf, etc.
- To add unlimited Goat records.
- To sync data between multiple devices.
- Access Goat family tree report.
- Ability to add Goat pictures!
From the Home screen of My Goat Manager, take the following steps;
- Tap on the menu icon from top left hand side of the app to show the drawer menu.
- Tap on Settings under the Preferences section.
- Tap on Default currency to change the currency.

From the Home screen of My Goat Manager, take the following steps;
- Tap on sync data button at the bottom of the home screen.
- Wait until the app brings a message "sync completed successfully"

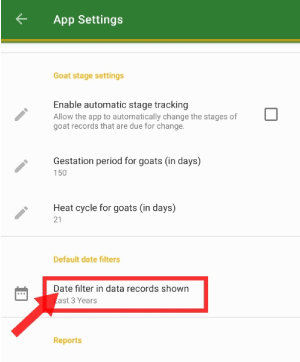
From the Home screen of My Goat Manager, take the following steps;
- Tap on the menu icon from top left hand side of the app to show the drawer menu.
- Tap on Settings to take you to the Preferences.
- Go to default date filters to set the dates for milk, events, breeding, and weight reports.
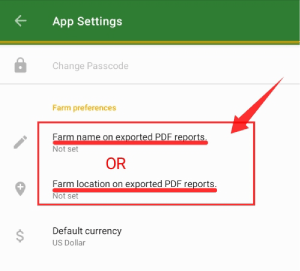
From the Home screen of My Goat Manager, take the following steps;
- Tap on the menu icon from top left hand side of the app to show the drawer menu.
- Tap on Settings to take you to the Preferences.
- Tap on Farm name and Farm location in order for you to set them.
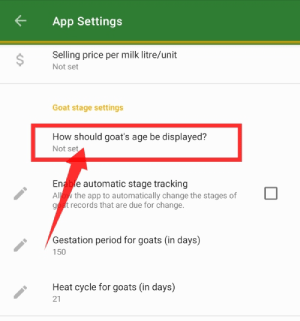
From the Home screen of My Goat Manager, take the following steps;
- Tap on the menu icon from top left hand side of the app to show the drawer menu.
- Tap on Settings to take you to the Preferences.
- Go to farm preferences and tap on "how should goat's age be displayed" to set the age for example weeks, months, etc.
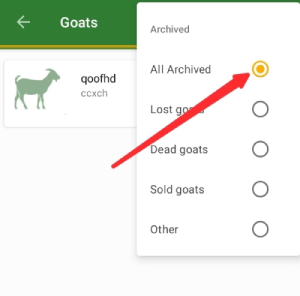
From the Home screen of My Goat Manager, take the following steps;
- Tap on the goat card.
- Tap on filter icon near the pdf icon in the top right-hand corner and then select "Archived, lost, dead, sold, or others"
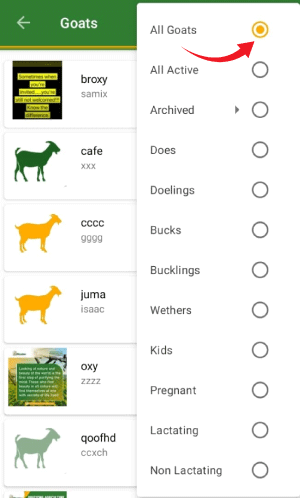
From the Home screen of My Goat Manager, take the following steps;
- Tap on the goat card.
- Tap on filter icon near the pdf icon in the top right-hand corner and then select "All goat" .
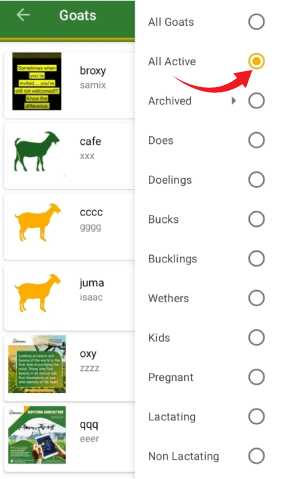
From the Home screen of My Goat Manager, take the following steps;
- Tap on the goat card.
- Tap on filter icon near the pdf icon in the top right-hand corner and then select "Active" .
From the Home screen of My Goat Manager, take the following steps;
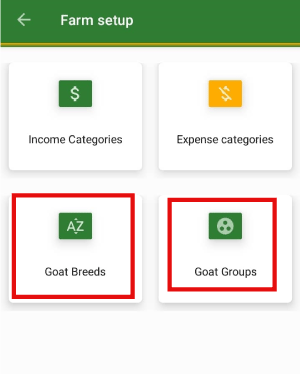
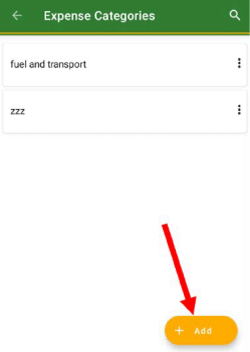
- Tap on the Farm setup.
- Tap on the Expense/Income category card to add expense categories.
- Tap on the Add button at the bottom of the screen.
- Enter the name of the category and tap on add to save it.
Note: If you want to add an income category, just take a reference of the above steps in the expense procedure.
From the Home screen of My Goat Manager, take the following steps;
- Tap on the menu icon from the top left-hand side of the app to show the drawer menu.
- Tap on Settings under Preferences.
- Go to farm preferences then tap on "Selling price per litre" to set it.

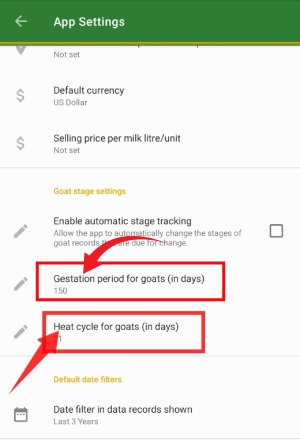
From the Home screen of My Goat Manager, take the following steps;
- Tap on the menu icon from the top left-hand side of the app to show the drawer menu.
- Tap on Settings under Preferences.
- Go to cattle settings and tap on goat's gestation period or goat's heat cycle to set them.
From the Home screen of My Goat Manager, take the following steps;
- Tap on the menu icon from the top left-hand side of the app to show the drawer menu.
- Tap on Settings under Preferences.
- Go to goat settings, and tap on then enable or disable automatic stage tracking.
From the Home screen of My Goat Manager, take the following steps;
- Tap on Farm Setup.
- Tap on Cattle breeds or Goat Groups card.
- Tap on Add button at the bottom of the screen.
- Enter the required or necessary information.
- Tap on ADD to save the goat breed or group.